

Some links below are Amazon affiliate links — as an Amazon Associate, King Panda Games earns from qualifying purchases at no extra cost to you. Full disclosure.
Most 7 Wonders Duel losses come from the same mistake: playing your own game while your opponent plays a different one. You’re building civilian points; they’re three green cards away from a scientific supremacy. You didn’t see it coming because you weren’t looking for it.
This guide is about looking for it. Three win conditions means three threats to monitor simultaneously — and only one of them needs to land.
The First Principle: Always Know Which Win Is Live
Before you take any card on your turn, answer this: can your opponent win next turn? Not “eventually” — next turn.
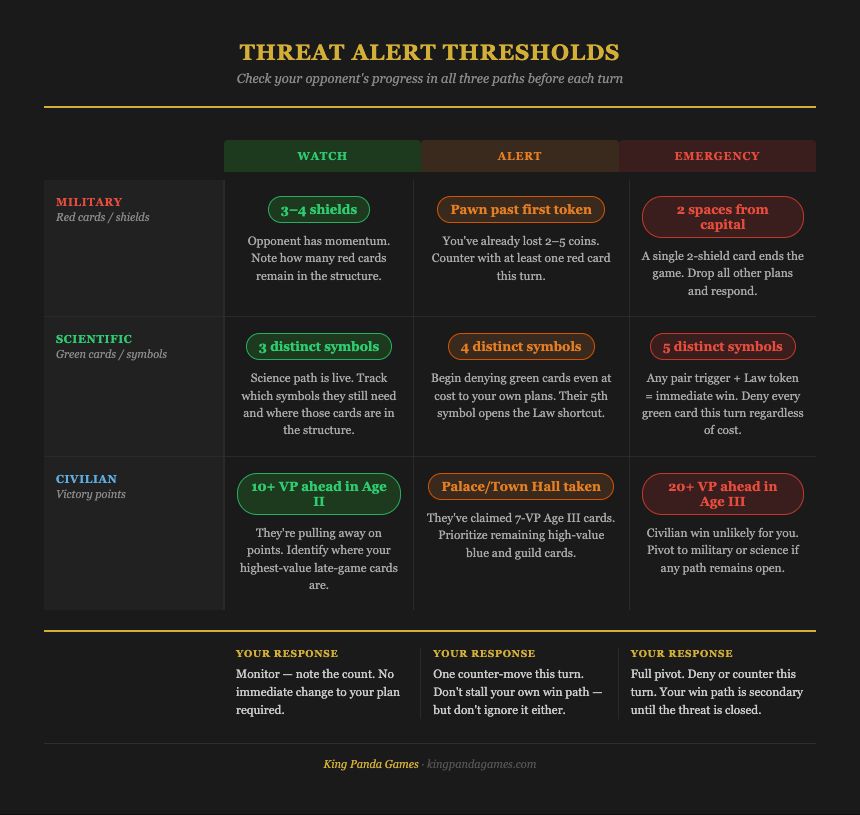
- Count their shield symbols. If the Conflict pawn is two or three spaces from your capital, you are one red card away from losing. Respond immediately.
- Count their distinct science symbols. At four different symbols, they’re close enough that denying green cards becomes a priority. At five, you’re in emergency mode.
- Count their victory points. If they’re already at 30+ points from buildings alone in Age II, the civilian race is slipping away.
The rule: before building what you want, check whether your opponent can take what wins them the game.
This isn’t paranoia — it’s the correct reading of a game with three simultaneous win conditions. Experienced players do this automatically. Beginners find themselves losing games they thought they were winning.
Age I: Production First, Not Points
The temptation in Age I is to build blue civilian cards for early points. This is almost always wrong.
Age I blue cards score 3 points each. A production engine of two or three brown and grey cards pays dividends across Ages II and III — both by reducing your own construction costs and by raising the price your opponent pays when they trade for the same resources.
What most players do: Take the Theater (3 VP, free) in Age I because it looks good on the scoreboard early.
What experienced players do: Take the Clay Pool instead, even if they don’t need clay right now, because it reduces trading costs for the rest of the game and taxes every clay trade their opponent makes from that point forward.
The exception: if a free blue card appears that costs nothing and you have nothing more valuable to take, grab it. But don’t actively prioritize points in Age I over production.
Chain symbols are the other Age I priority that beginners undervalue. The Baths unlock the Aqueduct (5 VP) for free in Age II. The Scriptorium unlocks the Library. The Tavern unlocks the Lighthouse in Age III. Identifying which chains your starting hand can support — and then securing the Age I card — can save 6–10 coins of construction cost across the game.
Age II: Read the Board, Commit to a Win Path
By mid-Age II, you should know which win condition you’re pursuing. Not “I’ll see how it goes” — a specific path, with a plan for achieving it.
“But what if I want to stay flexible?”
Flexibility is a trap in the late game. By the time both players reach Age III, the board is sparse and reactive — you’re fighting over the cards that complete your city, not building freely. A player who committed to military supremacy in Age II and built four red cards has a structural advantage over a player who “kept options open” and built nothing coherent.
The caveat: commit to a path, but hold your threat disguised. If you’re pursuing science, don’t spend Age II taking every green card visibly. Pair red cards in with your green ones so your opponent can’t read your intention as clearly. The board reveals information about what you’re building — obscuring it buys you turns.
It’s Age II, turn 6. You have three different science symbols and a Progress token that added a fourth. Your opponent has been building blues and yellows — no obvious counter-play. The School is face-up on the board. It adds a Wheel symbol, the same one you already have. A pair triggers another Progress token pick. You could take it and signal scientific supremacy loudly, or take a red card instead to disguise your path. The right answer: take the School. The Progress token you’d get is worth more than the information cost. But note exactly what green cards remain in the structure so you can plan your Age III sequence.
Not sure which token to grab when you get the choice? our full Progress token rankings cover all 10, tier by tier.
Age III: Force the Win, Don’t Wait for It
Age III is shorter than it feels. With cards removed during setup and both players building efficiently, the Age can resolve in 8–10 turns. Don’t treat Age III as another development phase — treat it as the closing round.
If your military is ahead, the time to push for military supremacy is Age III, not “eventually.” Every shield card you see should be evaluated for whether it closes the game immediately or meaningfully. The Arsenal (3 shields, Age III) can win games outright from a position two or three spaces from the capital.
If you’re pursuing scientific supremacy with five symbols already, the sixth doesn’t have to be a green building — the Law Progress token counts as a symbol. If it’s available on the board and you have five different symbols, taking it wins the game immediately.
If you’re going for civilian points, Age III is where the high-value blue cards live. The Palace (7 VP), Town Hall (7 VP), and Pantheon (6 VP) are your closing plays. Get there before your opponent can deny them.
Commerce: Yellow Cards Change the Math
Yellow cards (Commercial Buildings) are underrated by beginners because they don’t obviously score points. But three functions make them powerful:
-
Trading discounts: The Stone Reserve, Clay Reserve, and Wood Reserve fix the purchase price of that resource at 1 coin regardless of what your opponent produces. These are transformative in resource-rich games — building them early caps your trading exposure.
-
Economy token synergy: If you have the Economy Progress token, you gain every coin your opponent spends on trades. A player with the Economy token becomes actively invested in their opponent building production, because their opponent’s trades become your income.
-
Discard income: The discard action (2 coins + 1 per yellow card you own) scales with yellow card count. A player with four yellow cards who discards an unneeded card gains 6 coins — a significant mid-game injection.
The Decision Everyone Gets Wrong
When a card appears that you don’t need but your opponent clearly does, most players ask: “Is it worth my turn to deny them this?”
The question is too narrow. The real question is: “If they build this, how does the game change?”
A military card that pushes the pawn across the 5-coin token boundary is worth denying even at significant cost to your own plans. A science card that gives your opponent their fifth distinct symbol is worth denying. A blue card that adds 4 VP to an already-winning score is probably not — you’d be spending a turn to slow them slightly while your own plans stall.
Denial is best when it prevents a supremacy win or crosses a critical threshold. Don’t spend turns on small-margin denials.
For the full picture on what makes this game worth owning, see our 7 Wonders Duel review.
Don’t own 7 Wonders Duel yet? This guide assumes the base game.
Check 7 Wonders Duel price on Amazon →
Frequently Asked Questions
What’s the best strategy for beginners in 7 Wonders Duel?
Focus on production in Age I (brown and grey cards), read which win condition your opponent is pursuing by mid-Age II, and commit to your own win path rather than staying flexible. Don’t ignore the military track — losing 5 coins to a Military token midgame can derail an Age II plan completely.
Is military, science, or points the best win condition?
Scientific supremacy is the highest-ceiling win condition because it ends the game immediately regardless of score. Military supremacy requires a more sustained commitment to red cards. Civilian (points) victory is the most common outcome because it’s the default — the other two must be actively pursued and often defended against. At high levels of play, threatening scientific supremacy while building civilian points is the most dangerous dual strategy.
When should you deny a card instead of building what you want?
When the card crosses a critical threshold for your opponent — the fifth distinct science symbol, a red card that pushes the pawn past the 5-coin Military token, or a card that enables a chain your opponent has been building toward. Small-margin denials (blocking a 3-VP blue card) usually cost more than they’re worth. High-ceiling denials (preventing a Progress token trigger) almost always pay off.
How important is Age I production vs. scoring early?
Production almost always matters more than early points in Age I. Brown and grey resource cards compound across Ages II and III by reducing your construction costs and taxing your opponent’s trades. A 3-point blue card in Age I is worth exactly 3 points. A Stone production card can save 6–12 coins in construction costs across the game.
What should you do in Age III if neither player has won by supremacy?
Treat it as the closing round — not more development time. Identify your highest-value remaining plays (usually the 6–7 point blue cards and Guild cards), make sure to claim them before your opponent can, and avoid overcommitting to infrastructure. Age III is about finishing your city, not building it.
Should you always use the Wonders you drafted?
Build every Wonder you can — they’re generally worth more than an equivalent Age card and can’t be “lost” once you’ve paid the construction cost. The only exception is if you’re in a genuine resource crunch in late Age III and have no good card to put face-down under a Wonder. In that case, the Wonder is wasted, but that situation is a symptom of a broader resource problem, not a Wonder problem.
The clearest path to consistent wins: build production early, identify threats by the end of Age I, commit to a win path in Age II, and force the close in Age III. The rest is pattern recognition — the more games you play, the faster you read the board.